


Want to learn how to shoot more consistently and be a lights-out shooter in NBA 2K24? Wondering why you can’t shoot well in NBA 2K24? Well look no further! We have put together a ton of actionable NBA 2K24 shooting tips that you can start using right away for how to shoot consistently in NBA 2K24 and to go from a brick master or average shooter to a walking bucket.
Also See:
- NBA 2K24 Best Jumpshots
- NBA 2K24 Hot Zones & Lethal Zones Explained & How to Get Them
- NBA 2K24 Tips: How to Change Shot Meter, Shot Timing, Shot Feedback, Tips, & More
- NBA 2K24 Ultimate Dribbling Guide
Choose the Right MyPLAYER Build
Deciding on the best shooting MyPLAYER build to get greens is the first thing to figure out and will be a big factor in the success rate of getting buckets. Here’s how to narrow it down:
- Choose a build that has shooting loaded up as the main skill
- Choose a build with a substantial amount of Shooting Badges
- Builds should match your playstyle as a shooter. If you’re play style is more of a spot up, catch and shoot, spread the floor type of style, then it’d be more beneficial to go with a more 3PT heavy pure sharpshooter build. If your play style is more of a dual threat as a ball handler and shooter, then having a balanced build of shooting and playmaking would be the best. Shooting Badge setups for builds should also factor in your expected playstyle.
Find & Equip the Best Jump Shot for your MyPLAYER
- Find the Best NBA 2K24 Jump Shots
- If you haven’t found the right shot yet, try experimenting with different shot bases and releases.
- New “Shot Attributes” have been added / change for NBA 2K24, which include four unique categories that are factored into a jumpshot:
- Release Height – How high the shot is released
- Release Speed – How quickly the shot gets to its ideal release point
- Defensive Immunity – How effective the shot is against defensive contests
- Timing Stability – Adjusts shot windows to reward good timing at the cost of an increased penalty for bad timing
- Use the in-game Jump Shot Creator to create your own shot
- The Jump Shot Creator is an in-game tool for creating your own custom jump shot. You can choose from base, release 1 and 2, blending percentage, and release speed.
- Jumpshot Creator can be found in MyCAREER > Main Menu > MyPLAYER Appearance > Animations > Jump Shot Creator.
Get Your Shot IQ Up / Take Good Shots
A money jump shot can be equipped by any player, but instinctively knowing when to shoot is an intangible that players should know for the best shot success. Here are some tips to improve your Shot IQ:
- Don’t force bad shots. Having patience, while also recognizing opportunity, is key. The shot clock gives you 24 seconds, so utilize it to the fullest. When you take a bad shot – i.e. heavily contested, rushed, forced, etc – it’s basically a free gift to the defense and let’s your opponent off the hook.
- Always strive to get good looks of the basket where the defender isn’t close enough to heavily contest the shot.
- Make sure Shot Feedback is on (under Controller Settings)
- Adrenaline Boosts and stamina matter more than ever in NBA 2K24. Some shots may fall while your MyPLAYER is fresh, while other may brick when stamina is depleted. Factor this into your shooting as well.
- Be aware of hot and cold streaks with your MyPLAYER, as this factors into shooting success as well
Learn all the Shooting Controls
Getting familiar with every shot type is a great way to become a skilled shooter:
| ACTION | PS4/PS5 | XBOX 1/SERIES X |
|---|---|---|
| Jump Shot | Press & hold Square or RS down then release | Press & hold X or RS down then release |
| Free Throw | Press & hold Square or RS down then release | Press and hold X or RS down then release |
| Layup | Move & hold RS up (when driving) | Move & hold RS up (when driving) |
| Runner / Floater | Move & hold RS down while driving in close range | Move & hold RS down while driving in close range |
| Reverse Layup | Move & hold the RS right (while driving along the right baseline) | Move & hold the RS right (while driving along the right baseline) |
| Euro Step Layup | Double tap Square while driving & hold LS towards the off hand | Double tap X while driving & hold the LS towards the off hand |
| Cradle Layup | Double tap Square when driving & hold LS towards the ball hand | Double tap X when driving & hold LS toward the ball hand |
| Hop Step Layup | Tap Square while driving | Tap X while driving |
| Two-Hand Dunk | R2 + Move & hold RS up while driving in close range | R2 + Move & hold RS up while driving in close range |
| Dominant or Off-Hand Dunk | R2 + Move & hold RS left or right in close range. The RS direction determines the dunking hand | RT + Move & hold RS left or right in close range. The RS direction determines the dunking hand |
| Skill Dunk | R2 + Move RS up or down, quickly release, then move and hold RS up or down again. Release RS to neutral to time the dunk. | RT + Move RS up or down, quickly release, then move and hold RS up or down again. Release RS to neutral to time the dunk. |
| Flashy Dunk | R2 + move and hold RS down while driving in close range | RT + move and hold RS down while driving in close range |
| Controllable Rim Hang | While performing any two-handed dunk, keep R2 held when the player gets to the rim to perform a rim hang. Use LS to control swing, and move RS up to pull up on the rim. | While performing any two-handed dunk, keep RT held when the player gets to the rim to perform a rim hang. Use LS to control swing, and move RS up to pull up on the rim. |
| Pump Fake | Tap Square | Tap X |
| Hop / Stepback Gather | R2 + move RS in the direction you want to hop while standing or driving laterally OR Tap Square with LS deflected left or right | RT + move RS in the direction you want to hop while standing or driving laterally OR Tap X with LS deflected left or right |
| Spin Gather | Hold R2 + double tap Square OR Rotate RS clockwise then hold while driving with ball in the right hand | Hold RT + double tap X OR Rotate RS clockwise then hold while driving with ball in the right hand |
| Half Spin Gather | Rotate RS in a quarter-circle from right to up then hold while driving with ball in right hand | Rotate RS in a quarter-circle from right to up then hold while driving with ball in right hand |
| Step Through | At close range, pump fake, then press and hold Square OR Pump fake, then move and hold RS in any direction before the pump fake ends. | At close range, pump fake, then press and hold X OR Pump fake, then move and hold RS in any direction before the pump fake ends. |
| Putback | Press Square when attempting an offensive rebound | Press X when attempting an offensive rebound |
| Bank Shot | Move and hold RS up and release | Move and hold RS up and release |
Choose the Right Shooting Badges & Badge Stack
As we mentioned before, play style may determine which badges to equip. But overall, the shooting badges below are pretty common and can benefit any build. Check out the full list of shooting badges here.
New to NBA 2K24 are “Badge Tiers” A, B, C, and S (with S being the most powerful). If you’re a shooter, load up on S badges if possible when making your build and keep them optimized with the new “use it or lose it” badge system.
“Badge Stacking” is another method to maximize your shooting abilities by combining multiple badges at once — for example, “Catch and Shoot” badge + “Corner Specialist” badge.
- Beneficial Badges (Overall)
- For spot-up builds, prioritize
- For dual threat ball handler / shooting Builds, prioritize
- Utilize Badge Stacking
- Corner Specialist + Catch & Shoot + having a teammate (online or CPU) with Dimer Badge is an example of how to stack badges to maximize shot success.
Earn & Know Your Hot Zones / Lethal Zones
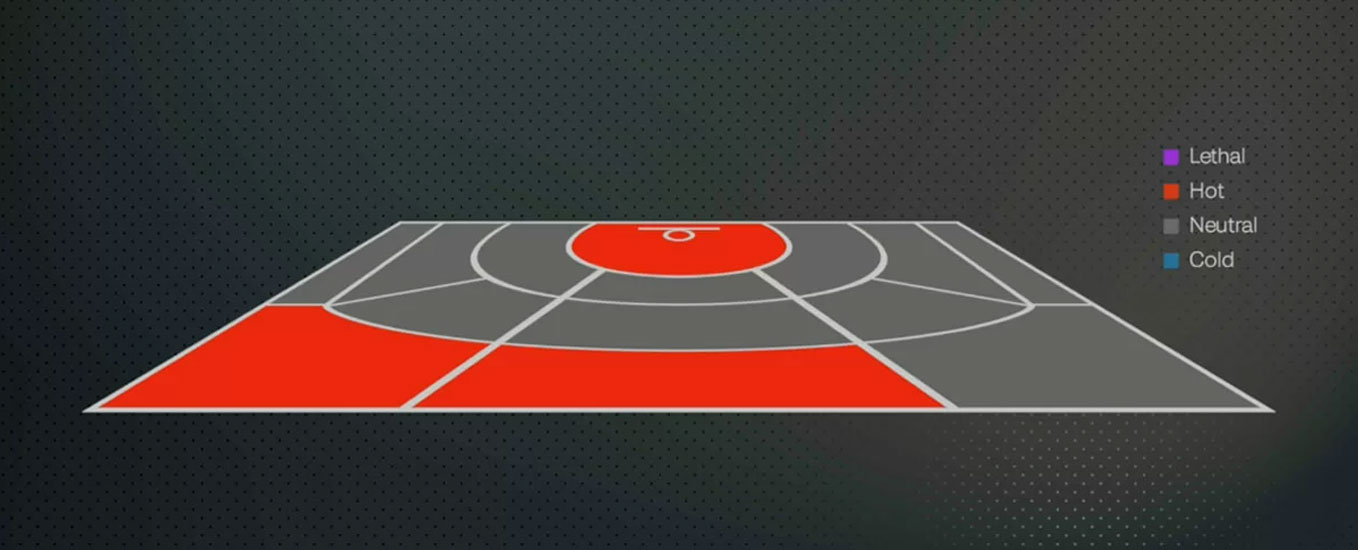
“Hot Zones” in NBA 2K24 are zones or “spots” on the court that dynamically change based on how well your player shoots from particular spots on the court. Shooting from a Hot Zone reportedly provides about a 5% boost to your shooting attributes, while shooting from a “Cold Zone” will have a negative impact on your shot making likelihood.
The location of your shots on the court, as well as the quantity of makes per attempt in various spots, is something to pay attention to in order to dynamically create your own Hot Zones. Knowing and developing Hot Zones are one of the key components to becoming a lights out shooter in NBA 2K24.
New to NBA 2K24 are “Lethal Zones”. This is the highest level of a hot spot that provides a major boost to shooting. But you can only have two lethal zones at a time and they reset every Sunday at 12 AM.
How to Unlock a Lethal Zone:
- Visit “The Art of Shooting” Gym in The City
- Talk to Chris Mathews a.k.a. “Lethal Shooter”
- Choose a hot zone
- Complete the shooting drill
Note: If you don’t have any hot zones, it will go from neutral to hot
How to Unlock a Hot Zone:
- 60% in Paint area
- 55% in Close Shot area
- 50% in Mid-Range area
- 40% in 3PT area
- In your last 25 games (MyCAREER, City, Rec, Pro-AM) with at least 10 shot attempts in each of those areas.
How to get rid of a Cold Zone:
- Keep shooting in the various court areas and get the percentages up to reach the Hot Spot criteria mentioned before.
- Wait 25-50 games and don’t shoot at all in that zone
Master the Shot Mechanics, Shot Meter, & Visual Cues
Shot Meter
You can use the shot button (x/square) or the right shot stick to shoot in NBA 2K24. It’s preferable to turn the shot meter to ‘off’ under controller settings, since it will increase your player’s “green” window size by 20%. If you do use the shot meter, look for visual cues (see further below) to go by, while also paying attention to the shot meter so that you can consistently time the shot.
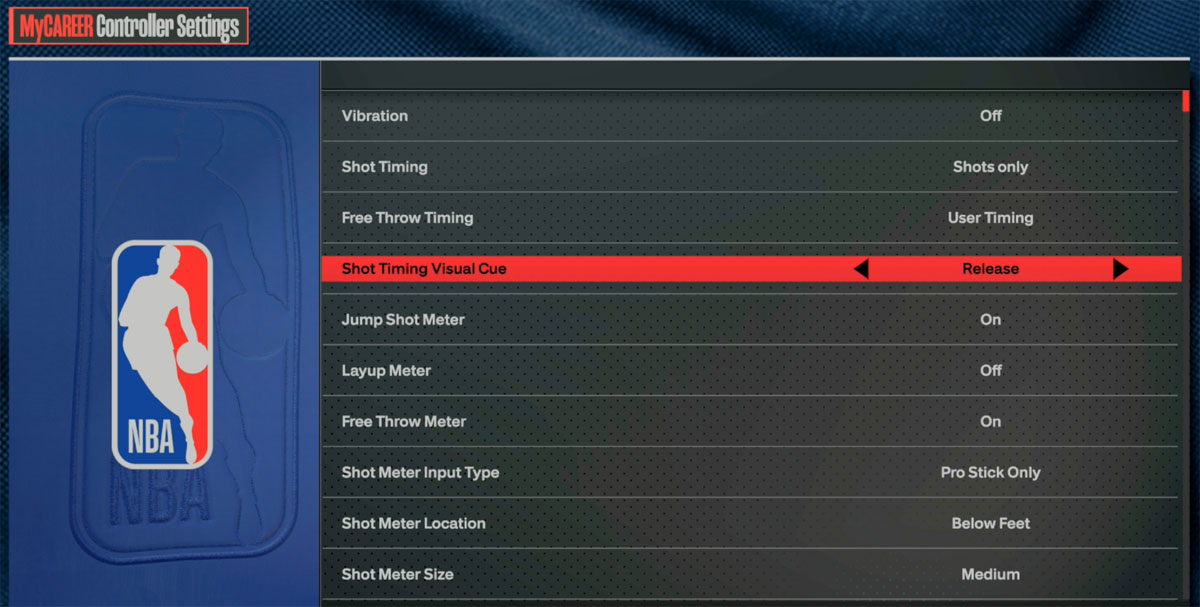
Shot Timing Visual Cues
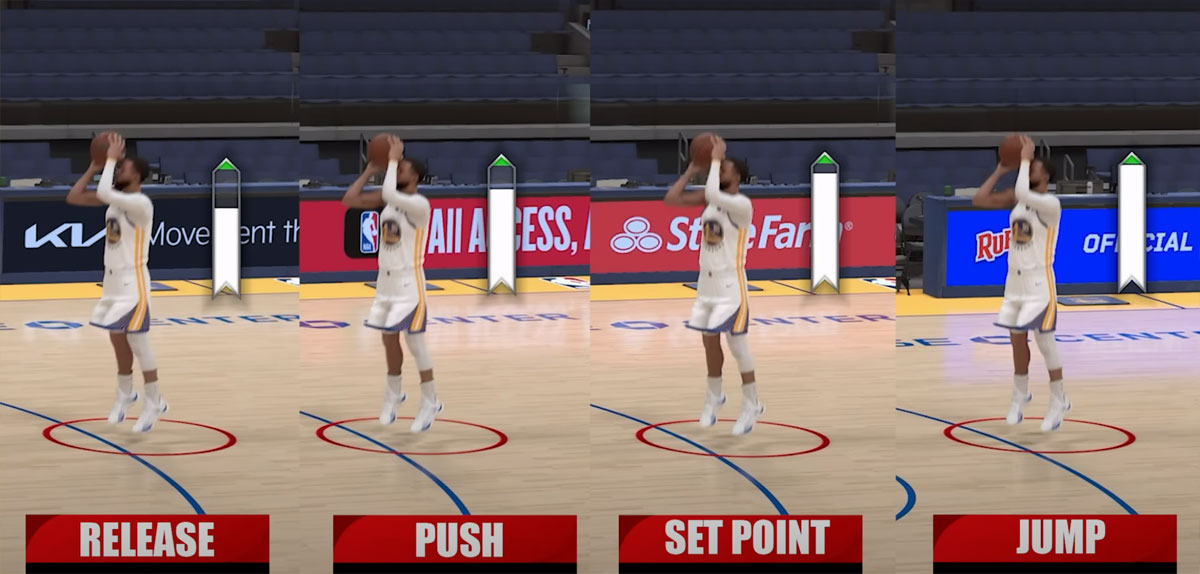
NBA 2K24 changed “Shot Timing Release Time” from last year to “Shot Timing Visual Cue”, which can be adjusted under Controller Settings. This let’s you change the shot meter timing and visual cues in relation to your shot. So basically it changes how long you’ll need to hold the button down for to time a shot and which visual cue to look for. The options are Release, Push, Set Point, and Jump.
- Release: the point just before the ball leaves the shooter’s hand
- Push (default): when the shooting motion is underway and the ball is being pushed forward
- Set Point: when the ball is raised up above the head before the shooting motion begins
- Jump: the point where your player’s toes leave the floor
Here is another reference for clarity:
- Jump = Very Early
- Set Point = Early
- Push = Late
- Release = Very Late
The setting you choose is highly dependent on what jumpshot you decide to go with and what you’re comfortable using, but many 2K Ballers are reporting success with Set Point and Push. Experiment with various timings and jumpshots to see which one works best for you.
Practice Practice Practice
We talkin’ about practice! Take advantage of shooting around in the City / Neighborhood, the Gatorade Gym, or an empty Pro-Am arena to work on new jump shots, work out the kinks in your shot, find the sweet spot of when to release the ball, etc.
- A good general rule is to take the shot at the peak of the jump.
- Work on all types of shots: off the dribble, spot-up catch and shoot, fadeaways, mid-range, 3 PT, in hot spot areas, etc.
- Practicing will get you fully familiar with every shot type in the game so that you have a number of shot varieties to attack the defense in different situations.
- Once you feel comfortable with your shot and jump shot mechanics from practicing, take it to an actual game, whether vs the AI or online multiplayer modes, to see how your shooting and jump shot performs against actual defense.
- Be sure to factor in input lag and delay while online and how it may affect your jump shot.
Conclusion
Hope this NBA 2K24 Shooting Tutorial helped you step up your game. Be sure to check back here for more NBA 2K24 gameplay tips!


