")


")


Like the name suggests, NBA 2K24 Controller Settings let you set your preferences for your controller in the game. Having the right setup can significantly impact gameplay, so be sure to check out every controller setting option (listed below) as well as our best / expert controller settings recommendations for NBA 2K24.
Also See:
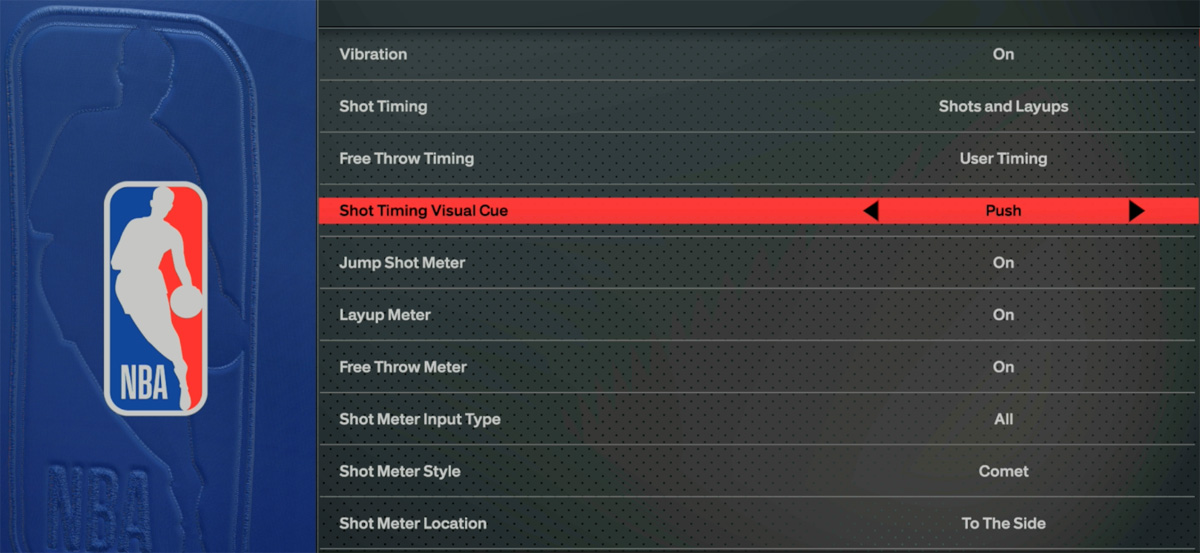
Vibration
- Description: Turn the vibration on or off
- Options: On, Off
- Rec’m: Set to ‘Off’ if you want less distraction
Shot Timing
- Description: Determine how user timing affects shot in game
- Options: Shots only, Layups only, Real Player %, Shots and Layups
- Rec’m: ‘Shots only’ or ‘Shots and Layups’ if you’re an advanced player
Free Throw Timing
- Description: Determine if user timing affects free throws in game
- Options: User Timing, Real Player %
- Rec’m: Set to ‘User Timing’ to have more control over the FT success rate
Shot Timing Visual Cue
- Description: Set your preferred animation cue to release the button during a jump shot
- Options: Push, Release, Jump, Set Point
- Rec’m: User Preference, depends on each jumpshot and your personal shooting tendencies. Check out the shooting guide for more info on Visual Cues.
Jump Shot Meter
- Description: Choose if you want the Shot Meter turned ON or OFF for Shots
- Options: On, Off
- Rec’m: Set to ‘Off’ or ‘Free Throw Only’ for a boost to your jumpshots
Layup Meter
- Description: Choose if you want the Shot Meter turned ON or OFF for Layups
- Options: On, Off
- Rec’m: Set to ‘On’ if you’re an advanced player
Free Throw Meter
- Description: Choose if you want the Shot Meter turned ON or OFF for Free Throws
- Options: On, Off
- Rec’m: ‘On’
Shot Meter Input Type
- Description: Choose when the Shot Meter is displayed based on the type of controller input
- Options: All, Shot button Only, Pro Stick Only
- Rec’m: None – User Preference
Shot Meter Style
- Description: Set your preferred Shot Meter type
- Options: Curved Bar, Funnel, Straight, Arrow, Comet, Tusk, Pill
- Rec’m: None – User Preference
Shot Meter Location
- Description: Set your preferred Shot Meter location
- Options: To The Side, By The Head, Below Feet
- Rec’m: None – User Preference
Shot Meter Size
- Description: Set your preferred Shot Meter size
- Options: Small, Medium, Large
- Rec’m: None – User Preference
Shot Meter Color
- Description: Set your preferred Shot Meter color
- Options: Green, Yellow, Purple, Orange, Red, Blue,
- Rec’m: None – User Preference
Perfect Release
- Description: Choose if you want the Perfect Release animation turned ON or OFF
- Options: Flame, Ball
- Rec’m: None – User Preference
Perfect Release Location
- Description: Set your preferred Perfect Release location
- Options: By The Rim, Left Side, Right Side, Above Player
- Rec’m: None – User Preference
Perfect Release SFX
- Description: Set your preferred Perfect Release Sound Effect
- Options: None, Catch Fire, Metal Clank, Laser, Fireworks, Jazzy Pop, Surprise! Power Blast, Angelic, Cash Register, Hollow Bang, Space Laser, Glass Break, Bucket, Money Machine, Sparkle, Whip, Sword Sheath, Eagle Screech, Water Bubbles, Future, Space Zap, Cartoon, Exhale, Tiger Growl, Futuristic Bass, Horn, UFO Door, Plastic Wrap, Whistle, Record Scratch, Vintage Space 1, Vintage Space 2, Glitter, 80’s Hip Hop, Horse Neigh
- Rec’m: None – User Preference
Player Indicator
- Description: Choose if you want the Player Indicator turned ON or OFF
- Options: On, Off
- Rec’m: None – User Preference
Player Indicator Style
- Description: Set your preferred Player Indicator
- Options: Circle, Basketball, Flame
- Rec’m: None – User Preference
Player Indicator Size
- Description: Set your preferred Player Indicator size
- Options: Small, Medium, Large
- Rec’m: None – User Preference
Player Indicator Color
- Description: Set your preferred Player Indicator Color
- Options: Red, Blue, Green, Yellow, Purple, Orange
- Rec’m: None – User Preference
Turbo/Fatigue Meter
- Description: Turn the Turbo/Fatigue meter on or off
- Options: On, Off
- Rec’m: On
Turbo/Fatigue Meter Size
- Description: Set your preferred Turbo/Fatigue meter size
- Options: Small, Medium, Large
- Rec’m: None – User Preference
Turbo/Fatigue Meter Location
- Description: Set your preferred Turbo/Fatigue meter location
- Options: On Floor, Above Head, Left of Player, Right of Player
- Rec’m: None – User Preference
Turbo/Fatigue Affiliation Icon
- Description: Enable or disable the Affiliation icon on the Turbo/Fatigue meter
- Options: On, Off
- Rec’m: None – User Preference
Pro Stick Function
- Description: Determine the functionality of the Pro Stick
- Options: Default, Dribble Moves, Shots
- Rec’m: Set to ‘Default’ for the flexibility to use RS for both dribble moves and shots
Pro Stick Orientation
- Description: Determine the orientation for the Pro Stick
- Options: Absolute, Camera Relative
- Rec’m: Set to ‘Absolute’ for consistent moves no matter the angle
Off-Ball Offense Mode
- Description: Determine the orientation for off-ball moves
- Options: Absolute, Camera Relative
- Rec’m: Set to ‘Absolute’ for consistent moves no matter the angle
Double Team Reaction
- Description: Determine when offensive team detects and reacts to a double team
- Options: Manual, Auto
- Rec’m: Set to ‘Manual’ for more control
Help Defense Button Function
- Description: Determine the functionality of the help defense button
- Options: Double Team, Call For Help
- Rec’m: None – User preference
Call for Pick And Roll Vs Fade
- Description: Determine if AI will auto select to roll or fade according to players tendencies.
- Options: Auto, Manual
- Rec’m: Set to ‘Manual’ for more control
Player Icons
- Description: Determine if you want the buttons to appear on screen when using Icon Passing.
- Options: On, Off
- Rec’m: On
Skip Pass
- Description: Determine if you want to hold down the primary pass button to target a receiver farther away.
- Options: Enabled, Disabled
- Rec’m: Set to ‘Enabled’
Icon Lead Passing
- Description: Determine if you want to directionally lead your receiver with Passing Icons
- Options: On, Off
- Rec’m: Set to ‘On’ to have more control over where you want the receiver to catch the pass.
Pro Stick Pass Type
- Description: Choose the type of pass you get when using Pro Stick Passing
- Options: Normal, Flashy
- Rec’m: Set to ‘Normal’
Icon Passing
- Description: Choose between Icon Passing control schemes
- Options: Default, Full Receiver Control, Pass Type Control
- Rec’m: None – User preference
Receiver Control
- Description: Choose how you want to control the receiver when holding the bounce button.
- Options: Receiver Get Open, Full Receiver Control, Handoff/Pitch Pass
- Rec’m: None – User preference
Pro Stick Defense
- Description: Determine the orientation when using the Pro Stick to play defense
- Options: Absolute, Camera Relative
- Rec’m: Set to ‘Absolute’ for consistent defensive moves no matter the angle
Shading Indicator
- Description: Turn the onball shading indicator on or off
- Options: On, Off
- Rec’m: Set to ‘On’ to see shading indicator
Who To Guard
- Description: An in-game indicator telling you who to guard in defensive situations
- Options: On, Off
- Rec’m: Set to ‘On’ if you’re a beginner, set to ‘Off’ if you’re advanced and want less distraction.
Defensive Assist Strength
- Description: Determine the effectiveness of AI defensive movement assistance
- Options: 0 thru 100
- Rec’m: Set to ‘0’ for more user control over defense
Boxout Assist Strength
- Description: Determine the effectiveness of AI boxout assistance
- Options: 0 thru 100
- Rec’m: Set to ‘0’ for more user control over rebounding
Pass Target Profile
- Description: Use a pass target profile to customize the way pass targeting works
- Options: Default, Openness, Direction, Custom
- Rec’m: None – User preference
Pass Target Direction
- Description: Determine the weight of pass direction for pass targeting
- Options: 1 thru 98
- Rec’m: None – User preference
Pass Target Distance
- Description: Determine the weight of receiver distance for pass targeting
- Options: 1 thru 98
- Rec’m: None – User preference
Pass Target Openness
- Description: Determine the weight of catch point openness for pass targeting
- Options: 1 thru 98
- Rec’m: None – User preference


")

