Like the name suggests, NBA 2K25 Controller Settings let you set your preferences for your controller in the game. Having the right setup can significantly impact gameplay, so be sure to check out every controller setting option (listed below) as well as our best / expert controller settings recommendations for NBA 2K25.
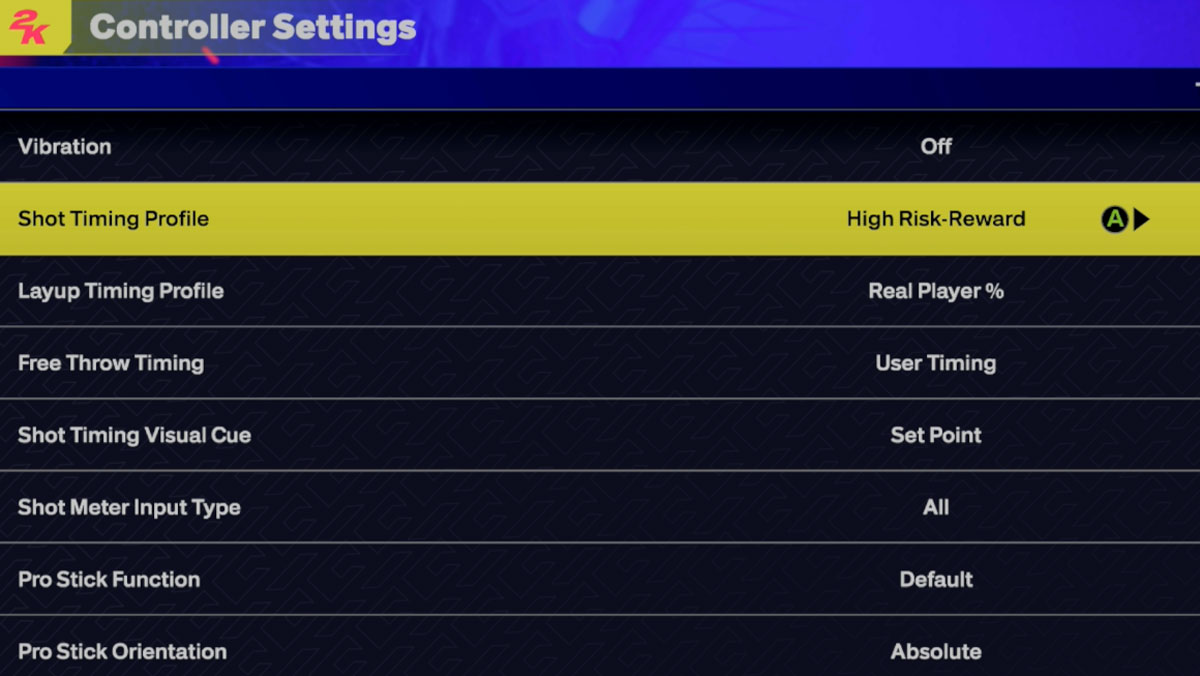
Vibration
- Description: Turn the vibration on or off
- Options: On, Off
- Recommendation: Set to ‘Off’ if you want less distraction
Trigger Effect
- Description: Turn Adaptative Triggers for collisions and fatigue on or off
- Options: On, Off
- Recommendation: Set to ‘Off’ if you want less distraction
Shot Timing Profile
- Description: Determine how user timing affects shot in game
- Options: Difficulty-Based, Real Player %, Low Risk-Reward, Normal Risk-Reward, High-Risk Reward
- Recommendation: If you’re advanced, set this to ‘High Risk-Reward’ for the biggest shot boost if you time it right (but it’s more difficult to time.) Set to ‘Low Risk-Reward’ if you have lag / slower connection to have the game be more forgiving on shot timing.
Layup Timing Profile
- Description: Determine how user timing affects layups in game
- Options: Real Player %, Low Risk-Reward, Normal Risk-Reward, High-Risk Reward
- Recommendation: If you’re advanced, set this to ‘High Risk-Reward’ for the biggest layup boost if you time it right (but it’s more difficult to time.) Set to ‘Low Risk-Reward’ if you have lag / slower connection to have the game be more forgiving on layup timing.
Free Throw Timing
- Description: Determine if user timing affects free throws in game
- Options: User Timing, Real Player %
- Rec’m: Set to ‘User Timing’ to have more control over the FT success rate
Shot Timing Visual Cue
- Description: Set your preferred animation cue to release the button during a jump shot
- Options: jump, Set Point, Push, Release
- Recommendation: User Preference, depends on each jumpshot and your personal shooting tendencies.
Shot Meter Input Type
- Description: Choose when the Shot Meter is displayed based on the type of controller input
- Options: Shot button Only, Pro Stick Only, All
- Recommendation: User Preference
Pro Stick Function
- Description: Determine the functionality of the Pro Stick
- Options: Default, Dribble Moves, Shots
- Recommendation: Set to ‘Default’ for the flexibility to use RS for both dribble moves and shots
Pro Stick Orientation
- Description: Determine the orientation for the Pro Stick
- Options: Absolute, Camera Relative
- Recommendation: Set to ‘Absolute’ for consistent moves no matter the angle
Off-Ball Offense Mode
- Description: Determine the orientation for off-ball moves
- Options: Absolute, Camera Relative
- Recommendation: Set to ‘Absolute’ for consistent moves no matter the angle
Double Team Reaction
- Description: Determine when offensive team detects and reacts to a double team
- Options: Manual, Auto
- Recommendation: Set to ‘Manual’ for more control
Help Defense Button Function
- Description: Determine the functionality of the help defense button
- Options: Double Team, Call For Help
- Recommendation: User preference
Call for Pick And Roll Vs Fade
- Description: Determine if AI will auto select to roll or fade according to players tendencies.
- Options: Auto, Manual
- Recommendation: Set to ‘Manual’ for more control
Player Icons
- Description: Determine if you want the buttons to appear on screen when using Icon Passing.
- Options: On, Off
- Recommendation: On
Skip Pass
- Description: Determine if you want to hold down the primary pass button to target a receiver farther away.
- Options: Enabled, Disabled
- Recommendation: Set to ‘Enabled’
Icon Lead Passing
- Description: Determine if you want to directionally lead your receiver with Passing Icons
- Options: On, Off
- Recommendation: Set to ‘On’ to have more control over where you want the receiver to catch the pass.
Pro Stick Pass Type
- Description: Choose the type of pass you get when using Pro Stick Passing
- Options: Normal, Flashy
- Recommendation: Set to ‘Normal’
Icon Passing
- Description: Choose between Icon Passing control schemes
- Options: Default, Full Receiver Control, Pass Type Control
- Recommendation: User preference
Receiver Control
- Description: Choose how you want to control the receiver when holding the bounce button.
- Options: Receiver Get Open, Full Receiver Control, Handoff/Pitch Pass
- Recommendation: User preference
Help Lob Pass Button
- Description: Choose the function of holding down the lob pass button
- Options: Skip Pass, Cut to Basket
- Recommendation: User preference
Passive Dribble Hand Switches
- Description: Determine whether to allow passive dribble hand switches when the left stick is released
- Options: Enabled, Disabled
- Recommendation: Enabled
Pro Stick Defense
- Description: Determine the orientation when using the Pro Stick to play defense
- Options: Absolute, Camera Relative
- Recommendation: Set to ‘Absolute’ for consistent defensive moves no matter the angle
Shading Indicator
- Description: Turn the onball shading indicator on or off
- Options: On, Off
- Recommendation: Set to ‘On’ to see shading indicator
Who To Guard
- Description: An in-game indicator telling you who to guard in defensive situations
- Options: On, Off
- Recommendation: Set to ‘On’ if you’re a beginner, set to ‘Off’ if you’re advanced and want less distraction.
Boxout Assist Strength
- Description: Determine the effectiveness of AI boxout assistance
- Options: 0 thru 100
- Recommendation: Set to ‘0’ for more user control and responsiveness for rebounding
Pass Target Profile
- Description: Use a pass target profile to customize the way pass targeting works
- Options: Default, Openness, Direction, Custom
- Recommendation: User preference
Pass Target Direction
- Description: Determine the weight of pass direction for pass targeting
- Options: 1 thru 98
- Recommendation: User preference
Pass Target Distance
- Description: Determine the weight of receiver distance for pass targeting
- Options: 1 thru 98
- Recommendation: User preference
Pass Target Openness
- Description: Determine the weight of catch point openness for pass targeting
- Options: 1 thru 98
- Recommendation: User preference
